 For small diameter thin wall tubes I use a pipe cutter which is quick and makes a square cut. Except that a pipe cutter does not cut cleanly since rather than removing material it pushes it to either side forming a ridge, inside and outside, and the cut itself has a bevel. These must be filed off. The squareness of the cut can be distorted if the file is not kept level.
A hacksaw cuts more cleanly. However to make the cut square it requires a miter stand or the tracing of a reference line when cut free hand. Better is to use a metal band saw. Since my cutting needs are modest I have not invested in a band saw for my workshop. Instead I use a variety of manual cutting methods.
For large diameter pipe, steel or aluminum, the challenge of cutting the pipe square is multiplied. Manual pipe cutters of such a large size are rare and expensive. Even if available they require a lot of muscle. A hacksaw can be used if a square cut can be traced beforehand on the surface.
This is not difficult if the pipe has a known square end to use as a reference. Surplus pipe often does not have even one square face. A different technique is therefore required. I did this recently when I required a square cut on a 3.5" diameter aluminum pipe. I took a few pictures to show how it's done.
 Draw a circumference
It's quite easy to scribe a circle around a pipe. You start at point A, travel orthogonal to the axis and come back to point A. But without a guide the line will almost invariably be a ellipse and not a circle. That is, it won't be square and the cut will be at an angle.
We need a straight edge that wraps around the pipe and does not crinkle, warp or that can lie askew. Guides I've tried and rejected include: tape, hose clamps, another bigger pipe, steel and fabric tape measures and drawing a line with a fixed marker while the pipe rotates. They fail because they are not rigid, rigid but not when stressed, a better but less than accurate edge or mechanical instability while drawing.
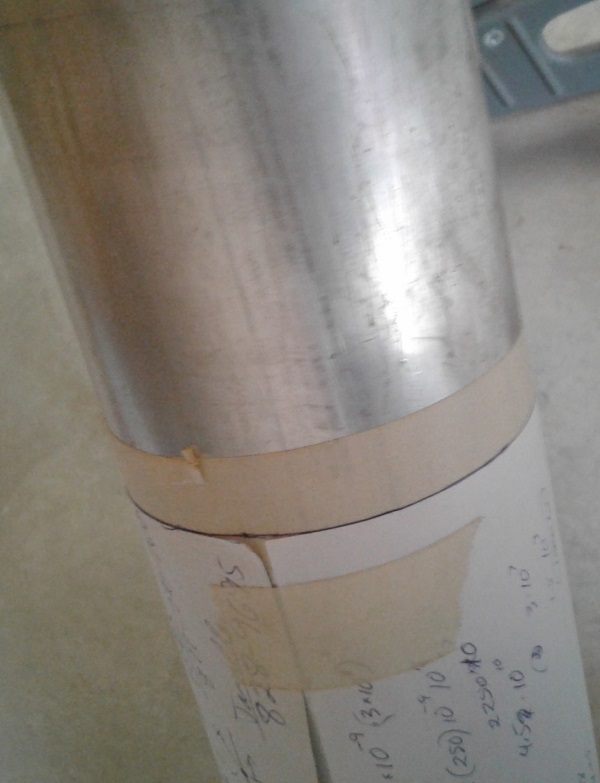
After considering the problem I found what is perhaps the most unlikely solution and one that covers half the space of my office desk: paper. Although it is easy to crumple and warp it is also easy to have it sit flat when wrapped around the pipe with a bit of tape and care taken to avoid "bubbles". The paper edges are a great straight edge when supported on a rigid surface such as a pipe. Paper is flexible with dimensional rigidity and is superior to straight wraps such as hose clamps because the sheet is wide: if it has a warp it will be immediately visible and can be corrected.
The pipe in the picture is 3.5" OD so an 11" paper edge (standard North American sheet height) almost exactly makes a circumference -- 3.5 × π = 10.9956. In this case the sheet is a little short since it doesn't quite reach around the pipe.
Masking tape on the pipe makes it easy to trace a fine line. The line doesn't have to be perfect provided there are no paper tears. If the pen or pencil wanders just fill in the gap and continue.
 Making the cut
Starting the cut is the most crucial step.
Lie the pipe flat on a stand where it can't roll but can be easily turned by hand. I use an ancient Workmate (40 years old!).
With your gloved hand (for protection) precisely guide the blade along the drawn line. Cut with light pressure, taking care to keep the blade from wandering. Correct any deviation immediately.
Rotate the pipe a bit and continue. When you've gone around once you have a shallow cut that will help keep the blade on the line. The tape will tear or be marked if the blade jumps as you cut, warning you to correct the mistake. This is most likely while the cut is shallow.
Continue cutting while rotating the pipe a little every few seconds. As the cut goes deeper you can use two hands on the hacksaw if the stand opening is wide enough that the blade's force doesn't rock the pipe.
As you go deeper take care to align the blade so that it doesn't lean to one side. Many hacksaws, such as the one shown, seat the blade at a small angle for improved work visibility and to counter a natural inclination to lean the hacksaw towards the dominant hand. A straight cut means less filing to remove a bevel and less chance of warping the pipe edge from excessive filing.
Eventually the blade will penetrate the wall of the pipe. Avoid the temptation to speed up and not rotate the pipe. Keep rotating the pipe and the cut will be cleaner.
Finishing
After completing the cut there is some filing to be done. Use a flat file across the full diameter of the pipe rather than filing one wall. This will keep the file flat and maintain the levelness of the surface. Burrs on the outside can be removed with the flat file and a half round file used on the inside.

The finished pipe stands perfectly vertical when on a level surface. When fit to the finished work the squareness of the cut was confirmed.
The use of this cut pipe will be described in a future article after I complete the new 140' tower. It forms part of the rotation system for the top mast. All the mechanical work to the top two sections is being done on the ground before being hoisted up.
Much appreciated for your article Ron. Maybe now my cuts will be squarer. 😎
ReplyDeleteThanks for your article Ron. Maybe now my cuts will be a bit squarer. 😎
ReplyDelete