Sunday, December 30, 2018

Year End Retrospective

My station building plan for 2018 was very ambitious. Too ambitious, as it turns out, so I had to walk back my expectations and prioritize projects. Even so I did accomplish quite a lot, although some of it has yet to bear fruit.

Here is what I managed to accomplish:
  • Build the 3-element 80 meter vertical yagi. The switching system, the final component, is now under construction. Assuming I sustain my energy to work in the cold weather it should be complete in January. Until then it is fixed on Europe.
  • After several iterations the prop pitch direction indicator seems to be working well. The next step is to improve the usability of the home brew control unit.
  • My planned second tall tower (140') was planted and is now more than halfway up (80'). Depending on weather and ground crew availability I will get to 100' this winter and complete it in 2019. It is not absolutely needed until late summer when I expect my long boom 20 and 15 meter yagis to be ready.
  • I gutted all the temporary coax and control cabling and rebuilt it from scratch. That project is nearing completion. When done I will be ready for SO2R and M1 and M2 multi-op low power, optimized transmission line performance and cabling ready to go for complete station automation. That final big step is a 2019 project.
  • Physical and electrical design and initial construction of long boom yagis stacks for 20 and 15 meters. These are slated for the new tower. Over the winter I will purchase enough aluminum to determine the optimum physical design for the elements. Two of the booms are built and I have the aluminum on hand to built the booms for the top (rotatable) yagis of the stacks.
  • Electrical and physical designs for high performance 40 meters yagis is underway. It is possible that I'll build a prototype element this winter and raise it on the tower to test its weather performance.
With respect to operating achievements there is much to be satisfied with:
  • Competitive contest performance in the low power and QRP categories. Three #1 plaques were added to my collection.
  • Exceeded my 6 meter DX objectives with FT8 during the summer sporadic E season.
  • 160 meter DXCC.
  • 300 DXCC entities, starting afresh from my return to the hobby in 2013.
  • Experimentation with additional shack automation features for contests.
I even found time to have a life outside of amateur radio and assist others with their towers and antennas. My 2019 plan will be finalized in the new year. It will still be ambitious but more doable since a lot of the advance work was done this year.

With respect to the blog I see that the article count in 2018 is comparable to previous years. That's a good sign that my enthusiasm for keeping it going hasn't declined. What does concern me is that there appear been fewer antenna articles than I'd like. From reviewing web site statistics most readers would probably agree. We all want more articles about antennas!

I do have a few antenna articles in the pipeline so that lack will at least be partially addressed early in the new year. Unfortunately for antenna articles my energies have been in part deflected elsewhere this year, so that is what I write about. Despite this I hope that there is enough variety and food for thought to keep you interested in coming back.

My regular audience is not exceptionally large. Although it seems to be slowly increasing it is not my objective to increase readership at all costs. I could do that easily enough by writing about politics! By continuing to focus on topics that interest me -- towers, antennas, DX, contests, etc. -- there is a natural limit to the potential audience. I'm okay with that.

Blogger is not the greatest platform for blogging these day. I find it difficult to make it easy for readers to comment without inviting a deluge of spam. Features are lacking and Google has pretty much abandoned the service with respect to bug fixes and new features. It isn't enough of a problem to incite me to make on the effort to move the blog elsewhere. I work around the problems and suggest that readers contact me by email when leaving comments is too difficult.

With that I will close off the blog for 2018. On the air I closed off the year with two contests: RAC Winter contest and the Stew Perry Top Band Challenge. The latter delivered some spectacular 160 meter DX for my QRP effort. Score details and soapbox can be found on 3830.

See you next year, on the blog if not on the air. I wish everybody a happy new year.

Wednesday, December 26, 2018

Choosing L-network Capacitors

Anyone who works on high power amplifiers and antenna matching networks know that suitable capacitors can be expensive. They must be stable, highly efficient and withstand high RF voltage and current. Choosing lesser components will only result in failure and replacement. Air dielectric capacitors, whether variable or home brew with a fixed value, work well but are large, usually far too large for where we want to fit them.

In my junk box I have a modest quantity of capacitors that are rated for high power RF applications. Of course one never has enough or of the desired values if antenna experimentation is to be done. Because I have been using no more than 200 watts since returning to the hobby several years ago I have often taken the easy way by using unsuitable capacitors in matching networks, knowing that they would most likely survive at these power levels. So far I've had no spectacular failures or excessive heating.

Since my plan is to run QRO eventually, probably next year, taking a shortcut on RF capacitors is no longer an option. I have done some reading and research to find alternatives that are not expensive and will do the job. This is important because I do like to experiment with antennas, which requires a stock of capacitors covering a large range of values.

As already stated, variable capacitors are too big. For the low bands fixed padding capacitors are needed in any case so variables are no panacea. Years ago variable capacitors were commonly used because there were few affordable instruments to measure antenna impedance and design a network to convert complex impedances to 50 Ω, and the math is difficult for most hams.

My 160 meter antenna L-network

We have made progress. Now I measure the feed point impedance with an accurate analyzer, plug the values into software tools and -- presto! -- out pops a matching network. I design coils again using software, pick one more capacitors and measure their value and built the network. It is now quite easy to get a near perfect SWR in one pass of this procedure. An example is my article on designing and building the L-network for my current 160 meter antenna.

For that network I needed a capacitor of around 2150 pf. From my junk box I pulled out an ancient 2200 pf disk ceramic capacitor. It worked well despite being of uncertain voltage rating and RF efficiency. But it was not without problems. There was a noticable temperature rise during extended contest operation on 160 meters, which in turn altered the capacitance and SWR.

To compensate I preset the rig's ATU for the "hot" capacitor. When the SWR started its inevitable rise I would switch in the ATU and continue operating without further problem. Happily the capacitor suffered no catastrophic failure as I feared.

This fall I attempted to improve the situation. The original capacitor (see above) was replaced by a chain of higher value disk ceramic capacitors. Power handling of small capacitors can be increased by connected higher value capacitors in series or lower value capacitors in parallel by decreasing voltage across or current through each capacitor, respectively.

It didn't work as expected. Although the photo is fuzzy you may be able to make out the "Z5U" rating symbols. I foolishly paid no attention. When put into service the heating effects were far worse than with the the original capacitor. Within 15 seconds of CW transmission at 200 watts the SWR swung wildly upward. Wait a minute and the low SWR returned. It was almost impossible to keep the SWR low without frequent re-tuning of the ATU.

Not all capacitors are equal

After a month of this I did what I should have done at first, which was to find out what Z5U means. In brief, the dielectric properties are such that the capacitance is acutely sensitive to temperature and efficiency is poor. These capacitors are suited to RF bypass usage where the capacitance value isn't critical. It was time to find something better.

For those who want a ham-oriented introduction to RF power capacitors I highly recommend an online article by I0JX. The technical depth is just enough to explain capacitor design and construction that the average ham should be able to understand. He surveys the variety of capacitors in the market and how to identify which ones are appropriate for high power RF applications, and how to pick the right capacitor at each point in a QRO amplifier. This is directly applicable to antenna matching networks.

It turns out that the 500 pf doorknob capacitor I used in the L-network of my short 80 meter vertical in Ottawa several years ago is not rated for carrying QRO. Rather it is only adequate for RF bypass. Fortunately it is big enough that the 100 watts maximum I ran at that time let it run cool. Not all of those large ceramic doorknob capacitors are the same.

Scrounging

While visiting a friend in early December he regaled me with the woes he's had with finding replacement capacitors in the pi-network of his Eimac 8877 HF amplifier. These are switched in for 160 meters because the air variable capacitors for the plate and load control need padding. Unfortunately the capacitors he had that were properly rated were too big to fit in the small space where the existing ceramic "doorknob" capacitors are situated.

My eyes lit up. I calmly asked to see these overly large capacitors that he can't use. He pulled out a cardboard box full of large and ancient mica capacitors. It was a treasure trove for a scrounger like me. Having done him a few favours he let me go through them and find what I needed. I was fortunate to find one with a value of 0.002 μF, which is 2000 pf. It measures 2300 pf, near perfect for my 160 meter antenna.

A week before Christmas I cut out the problematic chain of disk ceramic capacitor and popped in the mica capacitor. As you can see it's quite large. The screw holes turn out to be the same size as on my stock of doorknob capacitor, making it easy to attach to the existing fitting on one end. On the other end the screw holds the severed lead of the removed capacitor.

160 meter bliss

Back in the shack I turned on the transceiver and tested the modified L-network. The SWR was back to 1 at resonance, and less than 1.5 from 1800 to 1840 kHz. After 10 minutes of hitting it with 200 watts of CW the impedance was rock steady. In subsequent operation it has continued performing beautifully.

I am hopeful the capacitor will work well with 1000 watts. There is some reason for doubt. These ancient "sandwich" style mica capacitors are considered unreliable over long use due to the mechanical construction. New mica capacitors of equivalent rating are extremely expensive. My hope is based on the RF stability of all varieties of mica capacitors despite my failure to locate specs on the internet of this specific capacitor type. It's just too old, I guess. What little I could learn tells me that the RF current rating should be over 10 amps, more than enough to handle 1000 watts in an L-network designed for a moderate impedance transformation.

One further note on L-network design as it relates to capacitors. For every impedance transformation there are typically four topologies: shunt L or C and series L or C, with the shunt placed on either the generator or load port. The one I am using places a shunt C across the load port, with the L in series between the ports. Tools such as TLW, which comes with the ARRL Antenna Book, allow you to select the network topology.

I chose this topology because it produced values of C and L that were convenient to implement. Topology choice also determines whether the network rejects harmonics (low pass filter), an important consideration for SO2R and multi-op contests. At this time I did not bother to do so. I will when I decide on a permanent 160 meter antenna. My L-network designs for the 80 meter vertical yagi use a low pass filter topology.

Going forward

I continue to keep my eyes open at flea markets for high power RF ceramic capacitors. You have to get there early because they go fast! That is, the ones with high voltage and current ratings, and those with high capacitance values. The electrical boxes I use for matching networks have enough room for putting a couple of mica or doorknob capacitors in series or parallel to get the values I need. I can probably get a few more of the large mica capacitors from my friend to add to my stock.


For the two L-networks in my 80 meter vertical yagi I will conduct another experiment. I ordered a large number of small valued high voltage, high stability disk ceramic capacitors that I can add in parallel to get the values I need. These capacitors are very cheap when bought in bulk so the financial risk is negligible.

We'll see how they do in practice, first with 200 watts and later with 1000 watts. If it doesn't work out, well, it may be back to hunting for surplus mica and ceramic doorknob capacitors.

If you've never given much thought to the capacitors needed for building matching networks I hope this article has given you the incentive to learn about capacitors and encourage experimentation. For those who enjoy playing with HF and MF antennas you will see the difference when the proper capacitors are used.

Saturday, December 22, 2018

Inferior Tools and Their Uses

Not enough hams understand, appreciate or recognize high quality tools and hardware. I have been handed sockets that shatter when torquing a grade 5 bolt, knife blades that dull and notch when touching steel and screwdrivers whose tips break or bend. Recently a few low grade bolts were mixed in with my purchase of grade 5 bolts sets for splicing sections of my new tower, which I discovered when the threads stripped while leaning on the wrench.

Paying for quality makes good economic sense since you won't soon be shopping for replacements or left cursing at the top of the tower with no recourse but to come down and replace a failed tool or part. You know the saying: you can pay now or you can pay even more later. Over my long career as a ham I have learned the lesson through painful experience and I can now say that it is in my bones.

Despite this good advice there is a place for tools of lesser provenance. I'd like to cover a few of these as they relate to tower work.


Multi-sized ratchet wrench

When I first noticed these tools on the shelves of hardware store several years ago I turned up my nose at them. Ratchets are by nature prone to failure and the more features they sport the more unreliable they become. A fantastic sale price convinced me to give them a try. Now one have one or two of these with me on every climb. Each wrench has 4 sizes, two on opposite sides of each head.

The set I have hasn't yet suffered a failure. Considering how much use they get that's impressive. The tool encourages me to check bolts more often and make it easy to tighten them well. An important feature is that the ratchet can be reversed with a flick of the thumb of the hand holding it. Tools that allow one hand operation are wonderfully convenient when you're hanging off the side of a tower. Because the large head makes it impossible to fit these wrenches into small spaces such as splice bolts on triangular leg towers, read ahead to the next section.

Adjustable wrench

Can you remember the size of every fastener you have on top of your tower: tower attachments, antennas and electrical connections? Do you keep a record of each one use it to select the wrenches to pack for your climb? I do neither. It's tedious, prone to omissions and errors and you can never find the document when you most need it.

In addition to a selection of good quality open ended wrenches I usually pack a small adjustable wrench to avoid having a tool roped up the tower or, worse, having to climb down to get it. This tool is far from ideal but in a pinch you'll become a believer.

Utility knife

These are cheap, fit easily into a tool bag pocket, can be operated with one hand and despite easily dulling a fresh sharp blade is had in seconds. You can use them to sever tie wraps and tape in one motion, strip wires in a pinch and for other odd jobs. There are far better knives out there, ones with longer lasting blades, more ergonomic and sturdier construction. I avoid the cheapest ones that do not take replacement blades or provide a means to lock the blade position. The latter can prove dangerous.

Years ago I used a multi-blade camping style knife such as the venerable Swiss Army Knife. Despite their ubiquity the steel quality is not up to hard use and the blade can jackknife on your fingers with an injudicious motion.

Multi-tip screwdriver

Many small electrical connection screws on antenna feed points, baluns and control lines have a screwdriver head, not a hex head. The variety of tip styles is the dilemma. I always pack proper screwdrivers for the work I am planning, but too often I don't know which tip styles I'll need, or I need to work on a connection other than the ones planned.

A stubby multi-tip screwdriver such as that pictured is cheap and takes up little room in a tool pouch or pocket. The steel quality is better than I would expect for the price; I haven't yet ruined a bit. When not up the tower I keep it in a kitchen drawer for routine household repair jobs.

Old guying hardware

In my garage and outdoors I store an inordinate quantity of old and rusty guy hardware. These include thimbles (as shown), turnbuckles, guy grips. guy strand, shackles and much more. It finds occasional use when pulling and adjusting guys, lifting jobs, messenger cables and tram lines.

I would never use them to permanently guy a tower since they do not have enough service life remaining. Just be sure to inspect old hardware before using it. I am blessed with lots of space to store stuff that others would (sensibly) discard.

Cheap vinyl tape

For coax connectors and other critical electrical splices I use high quality sealing and protective tapes and covers. A roll of moderate quality vinyl electrical tape is usually in my tool pouch for less critical tasks. These include securing cables to towers, masts and yagi booms. Several wraps of vinyl tape holds well and doesn't risk excess compression from cable ties on expensive and fragile cable. I also use the cheaper tape to weatherproof temporary connections. Just be sure temporary doesn't become permanent.

On the ground it can be a handy way to secure coils of guy strand, coax and other long cables into tight, easily handled packages for transportation and storage. The tape can later be cut without a qualm since it is so cheap. Do watch for tape that can't be easily worked in cold weather or that leaves a sticky residue when removed. Cheap tape also has a habit of unravelling when exposed to weather.

Oops!

I drop things. Dropping tools from 150' can easily destroy tools, whether cheap or dear. It's comforting to know that if I drop a cheap tool I have lost little except time. But do make sure your friends below are wearing hardhats! When I drop a good tool I pull out one of my cheap tools.

Good tools can sometimes surprise. After going through a series of "lifetime guarantee" ratchet socket wrenches over the years that spontaneously disassembled I chose to invest in an expensive tool that I purchased in a shop that caters to professionals. A friend dropped it from 75' directly onto the concrete tower base.

The socket and wrench separate on impact. I never did find that socket, so it must have bounced a considerable distance. I expected the wrench to be junk. To my surprise it had only a small scratch on it and it worked perfectly. Two years later it's still working fine.

Spending money on good tools can pay dividends. Even so there is a place for cheap tools when doing tower work. Choose wisely and tower work can be proceed on schedule and without undue stress.

Gloves

Tower and antenna work is hard on gloves. Thin work gloves are inexpensive and I discard them when they are too worn for safe use. Gloves suitable for use in cold weather, of which we have an abundance, is another matter.

There are good products on the market, for a price. I try these from time to time. But for daily use I have another solution.

I participate in a variety of sports, including winter sports. As a matter of course I buy well insulated gloves with leather palms and that allow excellent finger flexibility. Eventually they wear out, sporting tears and other defects. When this happens they become tower gloves.

They are usually good for one winter season of tower work. Tears that expose the insulation can be patched with electrical tape with only a small loss of flexibility. Your hands stay warm and protected from abrasion and bruises at almost zero cost. You can typically find excellent sales on ski gloves of this type in late winter.

Even if you use good gloves be sure to keep a pair of cheap gloves with you. Otherwise you'll have a cold and painful descent when you drop one. And you will.

Saturday, December 15, 2018

First MSK144 QSO on 6 Meters

I have a decent antenna for 6 meters, 200 watts and WSJT-X. I used WSJT-X extensively during this past summer sporadic E season with great success. On this basis it should be a simple matter to try out meteor scatter on 6 meters. And it is! The recent Geminids meteor shower provided ample opportunity to learn how to do it.

After going through the manual and making the various adjustments to my setup to use MSK144 on 50.260 MHz I proceeded to monitor and make test transmissions. Within an hour I was comfortable enough to call someone without any real risk of messing it up. Soon I had my first MSK144 contact in the log.

Unfortunately this small accomplishment did not excite me. Indeed, I really don't know if it was meteor scatter or sporadic E, which is now reaching its wintertime peak. While monitoring activity with headphones I certainly heard the unmistakable signature of meteor trails on a variety of signals. It is less easy to determined what transpired during my QSO, or in fact in any specific case. It may have been a mix during the three minutes it took to complete the contact.

I have experience monitoring meteor pings in the 1980s and early 1990s when I was very active on both 6 and 2 meters . In the latter case it is easy to be sure that it is meteor scatter since sporadic E is so rare at the higher frequency. However, even then I never did overcome the hump between monitoring and participating. It seemed to require a lot of power and my plan to build a kilowatt amplifier was delayed then abandoned when I exited the hobby in 1992.

I like the new digital technology that makes meteor scatter so much more doable than with the CW and SSB procedures of the past. Perhaps if I were to try MSK144 meteor scatter on 2 meters I could become more enthusiastic. That will have to wait for at least another year. But I will give it a chance. Perhaps my present disinterest is due to the lack in the potential of achieving something unique and interesting that I can do the same or better on sporadic E. It isn't always easy to internally reflect on what motivates us.

Speaking of ennui, I ought to mention that my enthusiasm for winter sporadic E is muted, as it always has been. After monitoring the FT8 watering hole at 50.313 MHz for several hours there was not a single station that I have not already worked. In other words: same old, same old. As much as I delight in the technological and operating challenges of amateur radio I still want some novelty. DX possibilities in December are at best modest.

I'll put the digital modes aside for awhile. For sure I will be back for the summer sporadic E season, perhaps with a few improvements to my 6 meter antenna situation. The main one being to replace the RG213 with Heliax. Beyond that I will at some point return to 2 meters DXing, with a suitable antenna and power. When that happens I am sure that I'll try meteor scatter one more time.

Monday, December 10, 2018

Customizing Guy Hardware

Deep in my pool of partially finished blog articles is one about how one goes about calculating the guying requirements for tower and antenna loads. I may eventually finish that one, maybe. I've been reticent since I am not a structural engineer and I want to be sure to give reasonable practical advice that will not mislead. We'll see how that goes.

Instead I'll focus on a narrower topic in this article: customizing guying hardware for my new 140' guyed tower. When you buy a used and obsolete commercial tower and you want to be economical (that is, cheap) there may be components to be fabricated or improvised. Whether original or replacement, all components must be up to the demanding loads such a tower will be subjected to.

My choices are not necessarily the choices others would make. That isn't important. What does matters is to design and build components that are up to the demanding requirements. Many choose to overcompensate with excessively heavy, strong and expensive solutions. Having some understanding of what is going on can lead to more moderate solutions. That is my approach.

Anchor rods

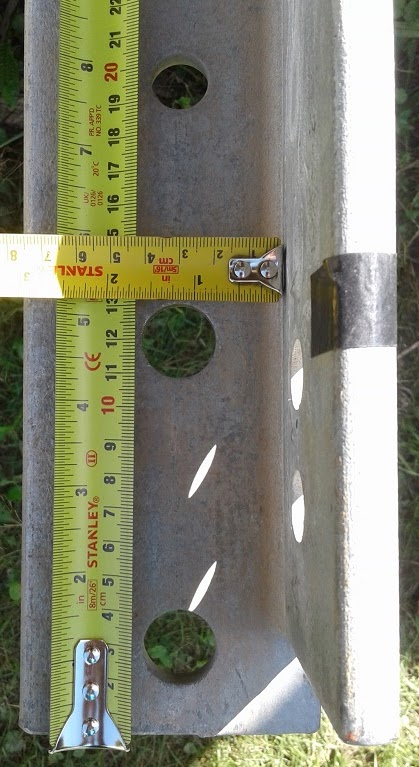
Wandering through my local tower company's stock of surplus parts several lengths of steel that made good anchor rods were spotted. These are galvanized angle stock 10'-6" long and ½" thick. There are pre-drilled holes suitable for attachments top and bottom. The larger ⅞" holes are the ones I used.

Although I neglected to take a picture of the completed anchor rods bottom end what I did is easy to describe. Approximately 3' lengths of ⅞" steel rod (which I got as part of the deal) were inserted through those holes. These are the load bearing members that couple to the reinforced concrete anchors previously shown.

I used two rods to double the load bearing surface. Using the bottom hole alone is a poor choice due to the small amount of steel between the hole and edge; guy tension pulls towards the top of the picture which puts the load on the bottom of the holes.

A typical commercial anchor rod for this application is 1" round galvanized stock. Since strength is largely in proportion to the cross-sectional area of the rod ½" angle stock of this size works well, and can be stronger if correctly adapted. I have seen ham towers with two ¼" angles back-to-back, which is roughly equivalent. One difference between round and angle stock is that the round stock behaves more predictably if the rod is not installed at the correct angle, both lateral and vertical. So if you do use angle stock, which is usually less costly, oversize angles are not a bad idea.

Guy attachment plates

Commercial anchor rods have at least a closed eye at the upper end for attachment of guying hardware. Mine have a few holes that I put to use. Those holes are symmetric with those on the bottom end. It was up to me to come up with a suitable attachment plate.

What I do have is the original L & R equalizer plates for this tower. There are 5 holes for ½" turnbuckles with U terminations (similar to shackle pins) and one large 1" hole for attachment to the anchor rod. My challenge was to design a simple and effective method of coupling the equalizer plate to the angle stock. The alternative is to weld the back of the plate to one edge of the angle, similar to what I did for the existing LR20 tower.

First, it helps to get a little bit lucky. I was able to find ½" galvanized plates of the perfect size in those aforementioned surplus bins. Again, the price was unbeatable. All I had to do was machine them to fit. That is, once I calculated the required load capacity. Let's start with a brief discussion about shear.


The diagram comes from a Fastenal technical reference on a variety of load applications for structural fasteners. I highly recommend it. It shows the correct way (on the right) to use a bolt to link three plates under double shear load. You can imagine that the upward load is the equalizer plate (with the guys) and the lower loads the previously mentioned use of two linked angles as an anchor rod. Notice the importance of ensuring the load bears on the unthreaded surface of the fastener.

In my case there is only one angle. Coupling them in the simplest fashion is a case of single shear, which places a large shear load on the bolt shank, head and nut. This can be done but is not ideal. Double shear keeps the full load on the shank, leaving the bolt head and nut to merely keep the plates in position. You'll see an application of single shear in the next section, and the fastener requirements.

The existing ⅝" holes in the link plates were widened to ¾" to accommodate the calculated diameter of grade 5 bolt to comfortably exceed the load requirement. The unthreaded section of bolt under the head is 1-½", perfect for 3 × ½" plates (the equalizer plate is ½").

For the calculation I assumed a peak load of 3× the pre-load of 1100 lb on 4 guys (30% of 5/16" EHS guy strand breaking strength). The Fastenal technical reference provides excellent information about the strengths of various fastener types and grades. Indeed it provides far more detail than most of us would ever want to know.

To confirm my calculation I asked a friend with an almost identical tower what he uses. He has the same size ¾" grade 5 bolt. Although he opted for an A325 bolt, which is not really necessary for double shear applications.

During construction the upper bolt is not fully tightened to allow the equalizer plate to freely rotate. It will be snugged up a little when I'm done to ensure the three plates cannot twist.

Notice that I used holes on the link plates and the anchor rod far enough back from the ends to ensure the maximum amount of steel surrounding the stress points. This left barely enough room to fit the turnbuckle pins.

Tower guy yokes

The tower came with only two sets of the original LR20 guy yokes. I need four sets. The guy yokes are unique items that, like the tower, have been out of production for at least 20 years. In the photo below I show one set that I used to temporarily guy the bottom section until the first permanent guy station at 30' was reached.


The are made of ½" hardened steel with 9/16" raised threaded ends for extra large bolts that prevent pull out from the purpose-made holes in all tower girts. The girts are designed for this purpose. I add washers under the nuts to reduce the potential for stress risers and bending of the girt steel, which is not uncommon with LR20 towers.

The yoke design is a good fit for guy termination thimbles. The method of tower attachment allows the yoke to pivot to accommodate the wide range of angles across all guy levels. Because the steel is so hard it takes a bit of muscle to hold apart the arms of the yoke for insertion into and removal from the girt.


The custom yokes I designed and had made in a machine shop are shown above. This was the second attempt after the ¼" galvanized plates I provided to the machinist were bent at a greater angle due to miscommunication. He made new ones from ⅜" plates, which I painted since they are not galvanized. Machining was completed in my workshop once I decided on how to attach the guys.

Look closely and you'll see a few features of interest. First, the ½" bolts and nuts that splice the tower sections are not the same as the ½" fasteners on the yoke. The latter are A325 bolts. These structural fasteners are described in detail in the referenced Fastenal document. The bolt heads and nuts are larger than standard fasteners. The required wrench size is ⅞" rather than ¾".

The greater bearing surface is needed to withstand the shear force between the tower girt and yoke plate. Again I refer to that Fastenal document for a diagram demonstrating such single shear loading. The bolt head and nut experience stress risers and the shank has bending stress. A325 bolts and nuts reduce that stress. The stress is further minimized by keeping the plates -- tower girt and yoke plate, in my case -- tightly bound by approaching the maximum torque.

Another A325 bolt binds the yoke plates. Without it the guy tension would gradually bend the plates and allow them to tilt downward, both actions will weaken the plates and reduce guy tension. You should also notice that the original bolt (left) isn't long enough to allow the nut to fully thread onto the bolt. This was corrected (right) before the guys were pulled tight. When the picture was taken there was 700 lb tension on the guy.

I could have used shackles to connect the guy thimble to the yoke, but I don't have enough of the appropriate size. The shackles I planned to use have a pin opening of ½", which is not enough to accommodate back-to-back ⅜" plates. They would have fit the original set of ¼" plates. Instead I drilled the holes out to ¾" to fit a heavy duty thimble and guy grip.

The custom guy yokes are used at the lower two guy levels -- 30' and 65' -- where the guy angle is closest to horizontal. Considering that these yokes cannot pivot this is the best place for them.

Bearing plate

The tower bearing plate is indirectly related to guying. Its function is to transfer the vertical tower load onto the base pillar without creating point stresses while allowing the tower freedom of movement (rotation and tilt). The force involved is substantial, of which the largest portion is due to the combined vertical component of the total guy force vector. The tower itself weighs less than 2000 lb (0.9 tonnes) yet the vertical force can exceed 10,000 lb (4.5 tonnes) under severe wind load.


The opening in the base section is 1-⅝". The pier pin is ~1.3"; it doesn't have to be a precision fit. The bearing plate is a surplus ½" galvanized steel plate that was pierced in a machine shop to slide over the pier pin. The plate is approximately 7" × 7".

The dimensions of the bearing plate are not critical; L & R recommended 8" × 8". For the design load the ½" thickness is close to the minimum size. Thinner plates will curl over time, reducing the effective contact area. A plate wider than the 12" diameter of the vertical rebar cage is not well utilized. Over the years there will be some grinding of the plate due to the rotational load of the yagis. This is preferable to rigidly attaching the tower to the base.

The bearing plate is grouted to the pillar to improve mechanical coupling and to ensure the plate is level. It is difficult to perfectly level the concrete pillar when the concrete is poured and wet. Downward pressure is placed on the plate while the grout is partially. The plate is adjusted with a level. Excess grout is scraped off the sides of the bearing plate.

Corrosion

You'll have noticed my emphasis on using galvanized steel and fasteners for all components. Corrosion protection at these critical points is mandatory. Rust weakens the tower and replacement of corroded parts will eventually be necessary. This can be done but it is not easy.

Where I wasn't able to use galvanized steel the parts are painted with good quality steel paint or with cold galvanizing compound. I do the same with old turnbuckles. Even the tower itself which is hot dip galvanized and painted was cleaned and given a fresh coat of paint, using a compatible primer over bare galvanizing where the paint has worn off.

Anchor rods of any type must be galvanized or use another ground-rated coating because corrosion due to soil chemistry can severely shorten its lifetime. It is a good idea to dig down a foot every couple of years to check the rod's condition.

I'll close with a picture of the tower raised to 70', using all the custom guy hardware described in this article. As one might say about winter tower work: sure it's cold, but there are no bugs!